Wednesday, October 12, 2011

Crab Ravioli

My messy work station, ravioli in the making
Photograph by Steve Rienecke


Crab Ravioli,
in a
Lemon Cream, Lobster Sauce

I packet of Won Ton Wrappers
8 oz Cooked Crabmeat
1 tbsp fresh Tarragon chopped
1 tbsp Chives, chopped
1 red chili pepper, seeded and chopped
½ tsp Lemon grass ( I use Gormet Garden, Lemon Grass herb blend, available in the fresh herb section of all good supermarkets)
½ tsp freshly ground black pepper
1/4 tsp sea salt crystals
1 tbsp Mascarpone cheese
pinch Paprika
Milk

Mix all ingredients except, won ton wrappers and milk, together in a bowl. 
Brush one won ton wrapper lightly with the milk, and place 1 tsp of the crab mix in the center, place another won ton wrapper over the top and press the edges together well to make a sealed package.
Repeat until all the crab is used.
Cover and place the ravioli in the refrigerator while you make the sauce.

Lemon, Lobster, Cream Sauce

2 tbsp unsalted butter
1 level tbsp plain flour
8 oz 2% Milk
6 oz heavy cream
1 tbsp Mascarpone cheese
Zest and juice of 1 lemon
½ tsp freshly ground black pepper
½ tsp sea salt crystals
8 oz cooked lobster meat
2 tbsp cooked crabmeat

Melt the butter over a medium heat in a heavy based pan, once the butter has melted remove from the heat and using a wooden spoon, stir in the flour. Gradually add the milk, stirring well, and return to the heat, reduce the heat to low and simmer for 5-6 minutes stirring continuously.  Add the cream and the Mascarpone and mix well to combine.  Stir in the lemon zest and lemon juice, lobster meat, crabmeat and season with salt & pepper.  Transfer the sauce to a liquidizer, and buzz well to make a creamy sauce.  Return the sauce to the pan and reduce the heat to lowest setting,  keep warm while you cook the ravioli.

Bring a large pan of salted water to the boil, drop the ravioli into the water in small batches, and cook for 2 minutes, or until the ravioli rise to the surface.  Remove with a slotted spoon and transfer to the sauce.  Repeat until all the ravioli are cooked.  Divide the ravioli equally among the serving plates, and sprinkle with the chopped parsley,  serve immediately.
I served the ravioli with caramelized carrots and broccoli sprouts.
Photograph by Steve Rienecke


Enjoy :o)


Pear & Raspberry Gateaux

This is a slight twist on my original pear gateaux, all I did was add a punnet of fresh raspberries.  I wish you could smell the sweet aroma that filled the house when this came out of the oven.

Photograph by Steve Rienecke


Pear & Raspberry Gateau

Large Tin Pear halves
1 punnet of fresh Raspberries
¼ cup granulated sugar
1 sheet of Puff Pastry
Round ovenproof flan dish

Preheat the oven to 400F
Drain the pears, and set aside on kitchen paper for a few minutes to absorb the extra juice.

Heat the sugar in a dry non-stick pan over a high heat, until it caramelizes, immediately pour the sugar into the flan dish and tip the dish to completely cover the base. 
The sugar will set very quickly, be extremely careful when pouring the hot sugar.
Slice the pear halves into approximately 4 – 5 slices each, and place into the dish on top of the sugar, laying the pieces side by side completely covering the base. Place the raspberries in the center and around the perimeter of the dish.
Roll out the puff pastry and place on top of the pears, shaping to cover the entire dish, tuck the excess pastry down around the edges.
Bake for 25-26 minutes.
Remove from the oven and place a serving plate over the top of the dish, then carefully flip it over so the pastry in now the base, and the caramelized pears and raspberries are on top. (see note below)
Serve either room temperature, or cold from the fridge with a dollop of whipped cream

Note: Use extreme caution when flipping the dish, as the sugar will be liquid and scolding hot.

Thursday, September 15, 2011

Time for some Real Decadence!

A few of you may be scratching your heads wondering why on earth I have a chocolate shake in a martini glass.  Read on and all will be revealed...

For the last 2 weeks since Danni's surgery, I've been experimenting big time with a multitude of different  foods to liquidize into smooth drinks.  I've found myself peeling strawberries, pressing all sorts of fruits and berries through the strainer, I've even blended and strained shumi for crying out loud!  I've fed everything green and healthy that I could lay my hands on into my blender, which by the way is working overtime, there are simply no limits to my culinary experiments, in my quest for flavorful, interesting food that can be served as liquid, there really is very little I haven't tried.

This week Danni's fabulous friend Julie, brought over a couple of truly scrumptiously, delicious shakes for us.  Both Danni and I absolutely loved them, the shakes were flavored with peanut butter and chocolate.  The deliciousness was just too much I absolutely wanted more and had to have a go at making it.  It was really pretty easy, and OH SO delicious, but being me I just couldn't resist the urge to spice it up a bit, change a few of the usual ingredients, to make it even more special.  


The finished product was heavenly, loaded with calories, and pretty potent, so don't be tempted to over indulge, hence the martini glass rather than a tumbler.  I have a feeling that this shake could become be a regular "go to" drink onboard Daisy.

The Daisy Shake


Daisy Shake

2 cups good Chocolate Milk, ice cold
1/4 cup Creamy Peanut Butter (organic)
1/4 cup Nutella
1 cup Rich Dark Chocolate Ice cream
1/4 cup Baileys
Splash of cognac

Whipped Cream for garnish  (optional)

Put all the ingredients in a blender and buzz till throughly mixed, serve in martini glasses topped with a dollop of whipped cream...

Enjoy :o)


Wednesday, September 14, 2011

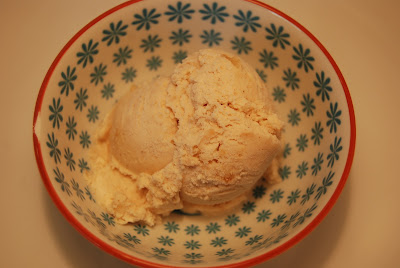
Apple Pie Ice Cream

Earlier this week I dragged out my ice cream machine, dusted off the cobwebs, and shortly after splashed out on a fabulous new book "jenis splendid ice creams at home" by Jeni Britton Bauer, which I found found in Barns & Noble.
All my children have told me of Jenis fabulous ice creams, so when I saw her book I just had to buy it.
Edi absolutely raves about the 'salty caramel ice cream', so I made a batch, carefully following her recipe, it was so easy and absolutely delicious; after having successfully made my first ice cream in 5 years, I decided to create a flavor of my own.

Everyone loves apple pie and ice cream,  so I thought "how about making an apple pie ice cream"?
This was very much an experiment, but judging by how fast it disappeared I think It's good enough to share.  It was exactly like eating apple pie and ice cream, just minus the crust.

I tweaked Jeni's recipe for the base ice cream, just a bit.  The result was a rich, creamy apple and cinnamon ice cream, with little chunks of chewy apple; the flavors and smells reminded me of Christmas, delicious...


Apple Pie Ice Cream

1 1/2 cups heavy cream
1 3/4 cup whole milk
1 1/2 tbsp cornstarch
2 ounces cream cheese, softened
1/4 tsp fine sea salt
3/4 cup vanilla sugar, recipe follows
2 tbsp light corn syrup
seeds from 1 vanilla pod
3 apples (I like to use granny smiths)
1 tbsp brown sugar
1 level tbsp cinnamon
1/4 tsp ground cloves
zest of 1 lemon
juice of 1 lemon
1 ounce unsalted butter


Peel and medium dice the apples, in a sauce pan over a medium heat melt the butter and then add the apples with the lemon juice, lemon zest, cinnamon, ground cloves and sugar, bring to a boil, reduce to a simmer and cook for about 4-5 minutes until the apples are soft but not mushy.
Remove from the heat and set aside to cool.


In a small bowl mix a little of the milk (about 2 tbsp) with the cornstarch to make a smooth slurry.


In a medium size bowl whisk the cream cheese and salt together until smooth, and set aside.


Mix the remaining milk, cream, vanilla sugar and corn syrup together in a large saucepan over a medium-high heat, and bring to a boil.   


Continue to boil for 4 minutes.


Remove the pan from the heat and stir in the cornstarch mix. 


Return the pan to the heat and continue to cook until the mixture has thickened slightly, remove the pan from the heat and stir in the vanilla seeds.


Slowly pour the hot mix into the bowl with the cream cheese, and whisk until smooth, set aside to cool for about 45 minutes.


Buzz the apple mix in a blender for about 30 seconds, just enough to puree some of the apples, but still leaving about half the mix with apple pieces.


Pour the apple mix into the cream mix, and using a spatula stir to evenly incorporate the apple with the cream.


Pour the entire mix into the frozen ice cream canister, and spin until the mix resembles thick ice cream (about 30 - 40 minutes).


Put the mix into a storage container with an air tight lid, and freeze for 2 - 4 hours.


Vanilla Sugar
1 lb fine sugar
1 vanilla bean, split


Put the sugar into a screw top jar,  push the vanilla bean into the center of the sugar, and leave for a minimum of 7 days.  


Enjoy :o)


Wednesday, September 7, 2011

What To Do?

So, here I am, sitting at my desk in between the hours of blending, pureeing and straining food, and simultaneously trying desperately to dream up tasty, nutritious rich liquids, that Danni can stomach, and will also provide her with all the goodness her body needs to remain healthy, without turning her stomach as she drinks it.
Because of the fractures in her jaw her teeth are wired together for the next four and a half weeks, so I need to get my game on and produce some tasty food.  I've poured over countless web sites and books for blended diets, and honestly they all seem to be so uninteresting and bland, apple and cabbage, beet and carrot, potato and kale... I've tried several of them without success,  Danni was unable to drink most of them, sipping just a teaspoon and looking at me with sad eyes because they were "nasty"!

We're currently one and a half weeks into the 6 week period, and Danni is already sick to death of the liquid diet, and I'm finding it really hard to conjure up new recipes.  Her food has to be totally smooth liquid, no seeds, lumps, or mash, or even thick liquid; it really limits the options.
Tonight however I actually hit on a successful blend, it sounds bizare and really quite unpleasant, but it was the first mix that Danni enjoyed.  I made a Chinese Hot and Sour soup, which is really more of a broth than a soup and then I added shumi, just before blending and straining, and she liked it.

Anyway I digress;  today I dragged out the ice cream machine, as I have a multitude of ideas for delicious home made ice creams, that I can serve soft to Danni so she can drink them.
So stay glued to this spot for some yummy ice cream recipe's...

Saturday, September 3, 2011

No More Recipe's !

I probably won't be able to post much over the next 5 - 6 weeks,  as my daughter Daniela is recovering from jaw surgery, and has her teeth wired shut.   She's unable to eat anything other than liquid, blended food, not something any of the readers of my blog would be interested in, and as I'm trying to take care of her, I don't want to fill the house with yummy cooking smells of stuff she can't eat.

So I'm doing the liquid diet too (after all misery loves company) as a way of supporting her, it helps me understand a little of what she's going through, with the exception of not having to take the nasty tasting medicine or deal with the pain :o(

But in the meantime, I'll be making notes, and dreaming up new yummy dishes that I can post once I can start cooking again.

Happy Labor Day Weekend :o)

Sunday, August 28, 2011

Did you know "I" Ile Flottante

Did you know Ile flottante is a French dessert consisting of a dollop of meringue floating on a bed of creme anglaise (a vanilla custard)?  Sounds very grand doesn't it!

Did you know this dish is known in English as "floating island", and in German as "snow eggs"?

The meringues are prepared from whipped egg whites, sugar and pure vanilla extract, cooked at a low temperature for a long period of time using a bain-marie, then un-moulded onto the creme anglaise.  Sometimes caramel is drizzled over the islands and sometimes it's decorated with toasted flaked almonds.

Did you know Ile flottante, was originally made using stale slices of savoy sponge cake or brioche that had been moistened with a liqueur, and sandwiched together with apricot jam containing chopped almonds and raisins, and served cold with a custard cream, or a puree of berries?


Floating Islands

3 1/4 cups of Milk
2 vanilla beans, split in half lengthwise
8 egg whites
3 tbsp caster sugar
pinch salt

Creme Anglaise
use the same milk as used for the islands
8 egg yolks
1 cup of sugar

Toasted Almonds or caramel for garnish


Put the vanilla beans and milk into a saucepan and bring to a steady boil, 
Whisk the egg whites  to stiff peaks with the salt, then fold in the sugar.
Using a tablespoon, gently drop portions of the egg whites into the boiling milk.  Turn the egg whites so they are cooked all over.  Cook for 2 minutes, remove the egg whites from the milk and drain on a cloth.

To make the custard, 
Whisk the sugar and egg yolks until the sugar dissolves, and the mix is pale yellow. Remove the vanilla beans from the milk and scrape the insides of each one with a paring knife to release the tiny seeds, return the seeds to the milk. 
Bring the milk to a gentle simmer and pour half of the milk over the egg mix, whisking gently.
Pour the milk/egg mix back into the saucepan with the rest of the milk and stir over a medium heat with a wooden spoon. Stir well being careful to scrape the mix from the sides of the pan where the cream is most liable to curdle.
DO NOT LET THE CREAM BOIL
Check the consistency of the cream by picking the wooden spoon out of the mix and running your finger along the back of the spoon, when the streak remains without the cream running down over the streak, then the cream is ready.
Immediately remove the cream from the heat.  
Continue stirring for 1 - 2 minutes, or the heat in the base of the pan will cause the cream to curdle.
Strain the cream through a strainer, and set over a bowl of ice to cool.  
Cooling quickly like this will prevent a skin forming over the cream.
When the cream is completely cold, pour into individual dishes and place the cooked egg whites on top, chill until ready to serve.  
Serve drizzled with caramel, or dusted with toasted almonds, or sprinkled with  freshly grated nutmeg.


Enjoy :o)

Saturday, August 27, 2011

Crispy Coconut Shrimp

When I'm on the boat many of the dishes I prepare involve using shrimp, it's one of those ingredients that's always easy to find in any supermarket in the Caribbean.   I usually have at least a couple of bags of frozen shrimp in my freezer on Daisy.  My entire family loves coconut shrimp, and there are literally hundreds of recipe's out there for making the dish, but after trying so many of them, changing and deleting a few of the time consuming stages and ingredients that I considered unnecessary, and a waste of time, I came up with this, it's so simple and only uses 5 ingredients.   It's a really easy 'go to' dish, colorful and tasty, and one of my family's favorites.  I usually Serve the shrimp with a dish of cherry tomatoes tossed with chopped fresh cilantro, and a splash of olive oil, a crisp green salad, and an ice cold glass of white wine.  


Crispy Coconut Shrimp


                1 cup shredded, sweetened coconut flakes
                3/4 cup panko bread crumbs
                1 teaspoon ground star anise
                2 egg whites
                1 pound shrimp, peeled and deveined, tail left on.
Leaving the tail on the shrimp makes dipping the shrimp in the egg white and breading less messy, and it looks pretty :o)


Preheat oven to 375 degrees F.
In a food processor, pulse the coconut until coarsely ground. 
Mix coconut with bread crumbs, and star anise, put into a shallow bowl, and set aside. 
Beat egg whites until foamy but not stiff. 
Dip the shrimp in the egg white and coat with coconut mixture. Repeat to form a double coating. Place shrimp on a  lined sheet pan, and bake for 10-12 minutes. 


Cherry tomatoes with chopped cilantro
and a splash of olive oil

Enjoy :o)


Friday, August 26, 2011

Did you Know "G" Garlic, Little Known Wonder Food

The health wonders of Black Garlic are seemingly endless, without going into too much detail, I've tried to break this down to a few basic facts about this fabulous food, that I think will interest my readers.


Black garlic is made by placing fresh raw garlic in a fermentation cabinet for natural fermentation for 60 to 90 days. Everyone is aware of the general heath benefits of common garlic, but the effect of black garlic is astonishing.  


Did you know that black garlic has a remarkable prevention and cure efficacy for diabetes, hypertension, hyperlipaemia and cancer?


Black Garlic has a soft jellylike texture, it has no bite or odor, and tastes like rich molasses mixed with tangy garlic.

Did you know that black garlic has high nutritional value, it can aid in eliminating fatigue, improving physical strength, solving constipation, protecting liver, improving activity of prostate, promoting sleep, etc?

Did you know that black garlic is a wonder food with functions of cancer prevention, blood sugar control, and internal organ strengthening. 

Did you know that garlic is the best anticancer food, it's considered in many cultures to be a wonder food, it's well known for nourishing, strengthening the body and eliminating fatigue?   


In Designer Foods Program issued by the U.S. National Cancer Institute in 1990, garlic was listed at the top of 48 common anticancer foods because it's the most effective food for preventing cancer. Meanwhile, it can reduce excess cholesterol and sugar of blood, and can also adjust the gastric bowel peristalsis. 

Black garlic is sweet, sour and delicious, and can also be served as dessert. According to the inspection results of food analysis, the amino acid contained in the black garlic is increased by 2.5 times than common garlic.


Black garlic is soft as fruit jelly after it is eaten, has no specific smell of the garlic, and causes no pessimal stimulation to intestines and stomach.

By fermentation, the medical effect of the garlic is strengthened.

Black garlic following fermentation and maturing has better health effect than common garlic, especially strong blood circulation adjustment and antioxidation. Though these effects can be achieved by common garlic, black garlic generates new ingredients on the basis of strengthening the former inherent ingredients in the process of fermentation and maturing, so its health effect becomes stronger. 


For those of you interested in the science's:

Allantolin Allicin, in black garlic, has good antibacterial property and can kill decades of pandemic viruses and morbigenous microbes; so does Allyl Sulfides [(CH2CH2 H2)2S], a kind of white greasy liquid. The Allantolin Allicin, even 10 thousand times thinned, is able to instantly kill Salmonella typhi, dysentery bacillus, influenza virus, etc. The volatile substances, lixivium and allicin of black garlic have remarkable inhibiting and killing effects to various pathogens in test tube, as well as to rotten funguses. Even stronger than benzoic acid and sorbic acid, it is the strongest natural anti-bacterial ingredient now.

Black garlics abilities in anti-aging and antioxidant are 39 times higher than common garlic. 

The aging process is the process of oxidation. And the super antioxidant effect of black garlic makes it able to fight many diseases and take good care of week bodies.

Black garlic, instead of simply controlling the blood sugar, protects the insulin and transforms glucose into energy, standing out from ordinary glucokinin products.


Information gathered from: www.cnrfs.com & www.foodspring.com


You can order black garlic from:   www.thespicehouse.com

Wednesday, August 24, 2011

Did You Know "F" Forcemeat

For the longest time, and well before I developed my passion for the culinary arts, I'm embarassed to admit that I didn't know what forcemeat was, I really didn't have a clue, which brings me to the idea for my blog section "did you know"! 
I don't have culinary school experience behind me, but I do have the experience learning from some masters in the kitchen, my Mother, Mother-in Law, Grandmother and my Auntie Kath, 4 of the greatest cooks I know, I also have a fantastic library of great cook books, and I'm an avid reader; my blog gives me the opportunity to share some of the knowledge I've picked up over the years.

Did you know forcemeat is a mixture of raw or cooked ingredients, chopped or minced (ground), used to stuff eggs, fish, poultry, game, meat, vegetables or pasta, such as ravioli and cannelloni?
Forcemeats are also the basis for several pates, meat pies, terrines, galantines and ballotines, not to mention all the different kinds of sausages.
There are 3 major categories of forcemeat; those made with vegetables; those made with meat, game or poultry; and those made with fish.  In addition, there is a 4th, more minor category of forcemeat, based on egg yolk.
The composition of a forcemeat depends in principle on the food that it is intended to stuff or fill.  The basis for a forcemeat is usually minced meat or fish; the additional ingredients, for example, gherkins, herbs, onion, ham, foie gras, crustless bread soaked in milk or egg whites, give it character and consistency.  Seasoning is also extremely important. 
Most forcemeats made of meat, poultry or game are bound with eggs.  The stuffing for a food that is to be boiled needs to be more strongly seasoned than one for food to be roasted.  However, in the latter case, the stuffing must contain sufficient fat to prevent the food from drying out, especially in the case of poultry.


This information taken from 'Larousse Gastronomique Culinary Encyclopedia'


My simple recipe for forcemeat, is using a shrimp forcemeat and eggs.  This is an easy, delicious and quick, appetizer or savory snack.

Photograph by Steve Rienecke


Daisy's Deviled Eggs

1 cup raw shrimp, peeled and deveined
6 hard boiled eggs, peeled, halved, yolks removed and set aside
2 tbsp mayonnaise (homemade is best)
splash of hot sauce
1/2 tsp fine Sea Salt 
1/2 tsp white pepper
Cayenne pepper 

Cook the shrimp for 1 minute in boiling, salted water, remove with a slotted spoon and set aside to cool.

Mash the egg yolks with a fork then press them through a fine sieve into a mixing bowl, and stir in the mayonnaise, salt and pepper.

Pound the shrimp in a mortar to make a paste add the hot sauce, and the egg mix, stir well to combine and then press the mixture through a fine sieve.  Spoon mix into a piping bag.

Pipe the mix into the egg white halves and sprinkle with cayenne pepper.

Enjoy :o)


Somerset Chicken with Somerset Cider

6 Chicken breast's with the skin on
8 oz tasty Cheddar Cheese, grated
8 oz Cider,  (plus a glass to drink while you're cooking :o)
2 Apples, peeled & chopped (I like Russets, but Granny Smiths are good too)
1 medium red onion diced
 8 oz wild mushrooms, cleaned & sliced
 8 oz double cream
1/4 tsp freshly grated Nutmeg
10 oz chicken stock (preferably homemade)
1 tbsp wholegrain mustard
3 tbsp plain flour
1 tbsp olive oil
2 oz unsalted butter
1 tsp Italian mixed herbs
Sea salt & freshly ground black pepper

Preheat the oven to 400 degrees.
Heat the olive oil in a large saute pan over a medium heat.
Season the chicken breasts well with salt and pepper and sear in the pan until golden on both sides.
Remove the chicken breasts from the pan and put them into a deep, oven proof dish in the oven to continue cooking.
Add the butter to the same saute pan used for cooking the chicken, when the butter has melted and stopped sizzling,  add the onions, and stirring gently, cook until soft and transparent.
Slowly add the flour, one tablespoon at a time, stirring constantly.
Add the chicken stock very slowly, making sure you stir well to incorporate all the flour without making lumps, and then add the wholegrain mustard.
Add the Italian mixed herbs, nutmeg, apples and mushrooms to the pan and continue cooking for about 5 - 8 minutes.
Next, slowly add the cider, followed by the cream, stir well to mix and cook for another 8 - 10 minutes to reduce the liquid
Season with salt and pepper.

Remove chicken from the oven, pour the sauce over the chicken, top with the grated cheddar cheese, and pop under a hot grill (broil) until the cheese is golden and bubbling, serve immediately with creamy mashed potato.

Enjoy :o)


Saturday, July 30, 2011

Devonshire Cream Tea

This recipe was passed on to me by my Auntie Kath from Devon, who was the most fabulous cook, and made really delicious melt in the mouth scones.   Scones are the main component in the traditional Devonshire Cream tea, which dates back as far as the 11th century.  I like to make the scones plain, although you can add dried fruit to the mix if you prefer.

Kath's Devonshire Scones


2 cups (8 ounces) Self-raising flour
1 egg made up to 5 ounces with full fat milk
1 level tsp Cream of Tartar
1/2 tsp Bicarbonate of soda
pinch fine sea salt
2 ounces unsalted butter, cut into pieces 
1 ounce fine sugar

Strawberry Jam
Clotted Cream
(if you can't get clotted cream you can use a whipping cream instead)

Preheat the oven to 400 degrees Farenheit

Sift the flour into a large bowl, add the cream of tartar, bicarbonate of soda and salt, and stir to mix.  With your fingers rub the butter into the flour  until it resembles fine bread crumbs, add the sugar and stir.
Beat the egg and milk together, and stir slowly into the flour to make a dough
Knead the dough just enough to bring it together, and tip out onto a floured board,  roll to about an inch thick and using a 2" cutter, cut individual rounds and place on a baking tray.  

Brush the tops with a little milk and bake in the center of the oven for 10 - 12 minutes, or until light golden brown. 
 Cool on a cooling rack.

When cool break in half and spread strawberry jam on one half, and a generous amount of clotted cream on the other, sandwich together, dust with confectioners sugar and serve with fresh strawberries and a cup of good English tea, with milk.


Traditional Devonshire Cream Tea

Enjoy :o)


Did you Know "E" Escabeche

Did you know that the dish "Escabeche" originated in Spain?

Escabeche is typical of Mediterranean cuisine, that traditionally uses poached or fried fish that's been marinated in an acidic solution of either vinegar or citrus, with added herbs and spices, after cooking.

This method of food preparation perfectly suits oily fish such as mackerel, herring, and bonito. The fish is seared and then placed in the marinade overnight or longer, before being served either cold or at room temperature.
Chicken, Pork and Rabbit are also used today for Escabeche dishes, as well as fruit and vegetables such as green bananas, and jalapeno peppers.
Escabeche is a popular presentation of canned or potted preserved fish, such as tuna, and sardines.
Did you know the origin of the word Escabeche is Persian, and was brought to Spain by the Arabs during the Moorish conquests?
 The word Escabeche derives from al-sikbaj, the name of a popular meat dish that was cooked in a sweet and sour sauce, usually vinegar and honey or date molasses.

This makes a thoroughly delicious, light lunch, or elegant appetizer.

When I'm on the boat, I typically use Snapper or Grouper for this dish, because they're readily available, and always really fresh.  I love fresh Salmon, but it's usually hard to find in the Caribbean, so when I'm back on dry land, and Salmon is readily available, I decided to try this dish using Salmon fillets instead.  It was so delicious I just had to share it with you, I hope you enjoy it as much as I did.


Salmon Escabeche with Black Garlic


6 small/medium Salmon fillets, skin removed
2 large Echalion shallots, peeled and thinly sliced
1 oz unsalted butter
1/4 cup Olive Oil
1/3rd cup Sherry vinegar
1/2 cup White Wine
3 Star Anise
2 tbsp good Balsamic Vinegar
6 cloves Black Garlic, thinly sliced (see note below)
Juice & Zest of one orange
4 Scallions, white and tender green parts only, sliced on the diagonal
1 tsp chili flakes
Sea Salt & Freshly ground black pepper

Black Garlic


Lightly season the salmon fillets with salt and pepper.

Melt the butter in a large saute pan over a medium heat, when the butter stops sizzling add the salmon, and cook for 3-4 minutes on each side, to sear (cooking time varies depending upon the size of the fillets).

Remove the fillets from the pan and place in a deep dish, set aside.

Put the shallots in the saute pan (using the same pan the salmon was cooked in), and cook gently for 10 -15 minutes, until soft and lightly browned.

Add the remaining ingredients to the pan and bring to a gentle simmer, stirring frequently.

Pour the mix over the salmon and set aside to cool.


Cover the dish with cling wrap and refrigerate overnight.

Remove from the fridge and set aside for 90 minutes.
Serve at room temperature with some of the marinade spooned over the salmon, a green salad, and some fresh baked bread.

Enjoy :o)


note: Black Garlic, to learn more about this delicious ingredient, and locate a supplier, copy and paste this link.  http://blackgarlic.com/

Thursday, July 28, 2011

Green is always good

I love discovering new recipes, especially when I stumble across them by accident.  Last night I made my crispy seaweed, which is basically just deep fried, thinly sliced collard greens, served with my special seasoning.

The trouble is when frying seaweed the fat flies everywhere, literally.  Mum and I had to wash the kitchen floor this morning, as it was so slippery from all the splattered oil.

"Please don't cook that again" Mum pleaded with me, this morning, and I wondered what I was going to do with all the shredded collard greens I had left in the fridge.  Not wanting to waste the greens, I racked my brains for a tasty recipe that I could use them in.
 
I decided to simply saute them in a little butter with the seasoning I had prepared... it took 5 minutes to prepare and WOW it was absolutely delicious.  I served them with potato wedges and sauteed duck breast with a plum sauce.

Mary's Sweet Greens

Bunch of Collard greens
1 ounce unsalted butter
1 tbsp fine sugar
1 tsp ground cinnamon
3/4 tsp fine sea salt
1/4 tsp ground chili powder


With a sharp knife remove the stalk from the greens, leaving the leaves intact. Lay the leaves one on top the other and roll into a cigar shape like a sausage, then slice very thinly.
Heat the butter in a saute pan, as soon as the butter stops sizzling, immediately add the shredded collard greens and saute for 2 minutes.
Mix the sugar, cinnamon, salt and chili in a dish and stir well, pour over the greens and stir to distribute throughout the greens, and serve immediately.
This really was delicious
Do try it...
Don't be fooled by the appearance, this is delicious.


Enjoy :o)

Wednesday, July 20, 2011

Showing off with Souffle

I'm always so impressed when people serve souffle, I see it as a visual work of culinary art, a dish that's created only buy professional chef's, a dish that I was convinced I could never do, and was always too nervous to attempt.
So one afternoon, I found myself alone in the house, I drew the blinds and closed the doors, and attempted my first souffle.  I had no recipe to follow, but I had seen one made recently on TV.  If it went wrong I could bin it without embarrassment and no one would be any the wiser, at least I would have attempted it.

As it turned out, it was one of the easiest desserts I've ever made, simple, quick, light and delicious, sadly souffle's have to be served immediately as they start to deflate after about 90 seconds.

Easy Apple Souffle

6 Granny Smith apples
1/3rd cup good Raspberry jam
generous splash of Kirsch
1 tbsp powdered drinking chocolate
(I like to use Cadbury's Drinking Chocolate)
1/2 tsp powdered cinnamon
1 ounce of butter softened
6 Egg whites
1/4 cup of sugar
pinch salt
1 level tbsp cornflour


Preheat oven to 350 degrees, 180
Cut the top off the apples, and discard, and carefully scoop out all the flesh, creating a cup. 
Butter the inside of the apples, sprinkle the powdered chocolate and a little cinnamon inside each apple, shake the apple to evenly distribute the powder.
Heat the raspberry jam in a saucepan until runny, add a splash of kirsch and the cornflour, stir well to mix and set aside. 
In a medium bowl (wiped around with a little white wine vinegar) beat the egg whites,  sugar and salt until stiff.  Fold the meringue into the jam mixture mix throughly but gently, and fill the apples with the mixture.
Level the mix with a knife, then run the edge of a teaspoon around \the rim of the apple, leaving a small gap between the rim of the apple and the souffle mix.

Cook for 12 - 13 minutes, or until well risen in the center of the oven,  dust with confectioners sugar and serve immediately. 

I got a little carried away with the confectioners sugar
it looks like a snowfall.

My first attempt at a souffle turned out pretty well, I was grinning like a Cheshire cat.  It really was so easy, now I'm going to try other sweet and savory souffle's, but I'll only be posting the successful ones.

http://video.pbs.org/video/1166762973/  copy and paste this link, with the fabulous Julia Child
Enjoy :o)